 |
| Introducing the new woodworking plans, Swans and Roses or Sunset model, coat racks. These plans feature a fun and easy way to carve with a hand held rotary tool and a 5/16" carving bit. This method of carving is great for a beginner because you can have great results, with just a little practice. These racks can be stained or painted in a variety of colors and finishes. If you are just not into crafting, these can be ordered on my website in the color or finish of your choice, but why not give it a try. They make great gifts and clean up that entryway with grace and style. You can order the plans on www.sawtoothideas.com under Eugenie Woodcraft, or order one of you choice on www.etsy.com/shop/woodcraftqueen. Eugenie woodcraft www.etsy.com/shop/woodcraftqueen www.sawtoothideas.com |
Thursday, February 28, 2013
Coat Rack Woodworking Plan
Butcher Block Island Woodworking Plan
Butcher Block Counter or Island.
Eugenie Woodcraft
Beautiful furniture, made simple.
www.sawtoothideas.com
 |
| This is a new woodworking plan now available on www.sawtoothideas.com. This is Esmeralda, my charming antique blue butcher block island. This island features two large drawers that open from the front or the back. She has a towel bar on one side and room for hooks on the other. She is not too large, (36"long, by 20" wide and by 36"high, and will fit in most kitchens. This Island can be built in a weekend using my simple, glue, screw and cap method which allows even a novice to build furniture in a reasonable amount of time. The carving is done with a hand held rotary tool, a fun and easy way to carve. |
 |
| This is the side view of the towel bar. |
 |
| This is the rose corner on the butcher block, top. |
Beautiful furniture, made simple.
Sunday, February 24, 2013
Tea Cup Shelves
Tea cup shelves
Eugenie Woodcraft
www.etsy.com/shop/woodcraftqueen

 |
| I started out building shelves when I first started woodworking. I now have 10 models of tea cup shelves, and 26 shelf models in all. The cups pictured are part of my collection, some are from my grandmother and the rest are from trips to the flea markets and antique shops. It is a shame to hide away something so pretty. When I have tea with my friends, I let them pick their favorite cup. This is also a big hit with my grandchildren. These shelves are available on Etsy, or you can let me know what you want and I can make one custom. The woodworking plans will soon be available on Sawtooth Ideas |
www.etsy.com/shop/woodcraftqueen

Painters Easel, Artist Easel
Amelia, my beautiful, artist or painters easel.
 |
| This is one of my favorite furniture pictures. Sometimes I have an idea in my head when I design something, and this picture is exactly what I was thinking. This is my easel, Amelia. She features an adjustable canvas bar and a box to hold all the painting equipment. There is a handle on the side to carry the easel and a wing nut to hold the legs in place when you are moving the easel. This easel can be used to hold menu's, your favorite painting, with a flower arrangement in the box, and is also great for announcements. Amelia can be ordered in Pecan, or Special Walnut. She is available on my Etsy shop. www.etsy.com/shop/woodcraftqueen Eugenie Woodcraft |
Saturday, February 23, 2013
How To Build A Coat Rack, Part 1
How to build a coat rack.
A coat rack makes a great beginner project. They can be made any size you desire, and the designs you can carve on them is endless. This coat rack is carved with a bird and branch using a hand held rotary tool and a 5/16" carving bit.
 |
| To build a coat rack, you will need 4 maple pegs, two maple caps, and a piece of pine board. You can buy the caps and pegs at your local hardware store or on Workshop Supply on line. The pegs I am using are 3 1/2" long. The tools needed are, a drill press, a brad point drill, the right size for your maple caps, and a band saw. |
 |
| Make a jig, similar to this one to put on your drill press. This one is 10" by 14'" and the jig tapers from 2" down. This jig is used to hold the coat rack at the desired angle, on the drill press, so that all of your pegs will be at the same angle. |
 |
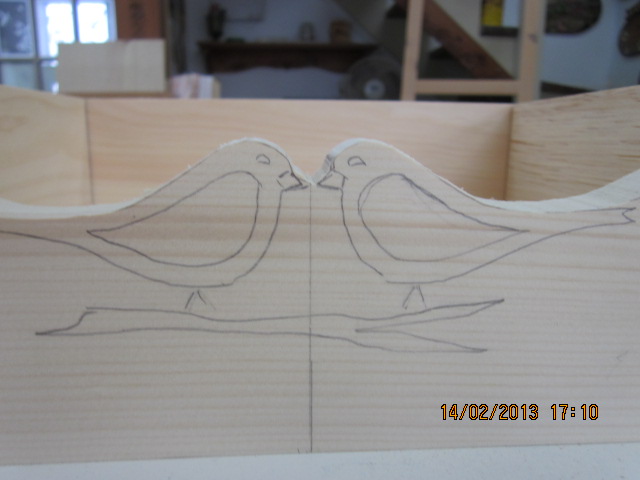
| Draw your outline and design on your board. |
How To Build A Coat Rack, Part 2
 |
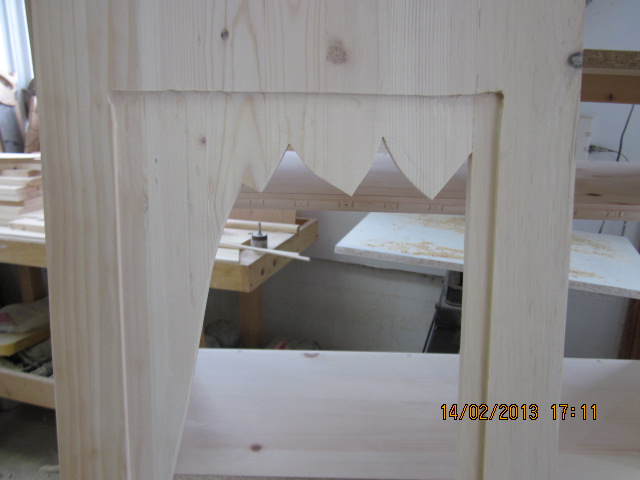
| Use the band saw to cut out the coat rack outline. Then sand the edges thoroughly. |
 |
| Use a hand held rotary tool and a 5 1/6" carving bit to carve the bird and leaves. If you have never done carving like this, practice on a piece of scrap wood. When you are finished carving, sand the coat rack following the grain of the wood. |
 |
| Measure the size of your cap and use a brad point drill to make a hole for the cap. Don't drill to deep, just deep enough for the cap. Then drill a small hole about the size of a #8 wood screw right through the board. Now you have a small hole for the screw and a larger hole for the cap. When the rack is hung on the wall, the cap will hide the screw. |
How To Build A Coat Rack, Part 3
 |
| Put the jig on the drill press table, (I have extended my table top, this is not necessary, but helpful.) Measure the bottom of the peg, and use the right size drill to make the holes. Use a piece of scrap wood to make a test hole, this will prevent you from ruining your already carved coat rack.The peg should fit nice and snug. |
 |
| Roll the end of the peg in the glue. |
 |
| Use a rubber mallet to tap the peg in firmly. Then wipe off any excess glue. If you don't wipe off the glue before it dries it will not stain neatly. |
How To Build A Coat Rack. Part 4
 |
| Now the coat rack is built and it is time to put the finish on. This is my son Robert, a few years ago. He is in my work shop, and he actually did build this coat rack while I took the pictures. |
 |
| This coat rack is coated with Pecan stain. Use gloves, and work evenly. If you stop for a few minutes, it will leave a mark. Don't forget to stain the caps. When it is completely dry, apply three coats of polyurethane, sanding in between each coat. I use a sponge sander. It is gentle and makes the wood nice and smooth |
 |
| This is the finished coat rack. I antiqued the top two with gold antiquing The bottom one is finished in Special Walnut. the middle one is painted with cream paint, then is antiqued with antique gold craft paint. These racks are available on etsy, unfinished or finished. |
www.sawtoothideas.com
Eugenie Woodcraft
Beautiful Furniture, Made Simple
Tuesday, February 19, 2013
12 Cup, Tea Cup Shelf, Conessieur edition
Before and After
This is Josephine, my new model of tea cup shelf. She features enough place for 12 tea cups, with a groove for the saucers and three little drawers to store your tea things. She is carved with roses and leaves.
Eugenie Woodcraft
Beautiful furniture, made simple.
www.etsy.com/shop/woodcraftqueen
These plans are also available on
www.etsy.com/shop/EugenieWoodPlans
 |
| This is the Tea Cup Shelf before I put the finish on. |
 |
| This is the Josephine , after one coat of pecan stain and three coats of polyurethane varnish. This is my collection of tea cups, some from my grandmother. |
Beautiful furniture, made simple.
www.etsy.com/shop/woodcraftqueen
These plans are also available on
www.etsy.com/shop/EugenieWoodPlans
New Small Shelf Models
These are three new models, unfinished.
 |
| There is a Duck, a Sunset and a Daisy Shelf. |
 |
| This is a new Sunset model. I have stained it Special Walnut. |
 |
| This shelf is my Antique Daisy Shelf |
 |
| This is my Darling Ducks Shelf. |
Beautiful furniture, made simple.
How To Paint And Antique A Daisy Shelf, Part 1
This shelf can be bought on etsy, unfinished or you can buy the woodworking plan on Sawtooth Ideas when it comes available. This shelf only requires a table saw, a band saw , a router, and a hand held rotary tool.
 |
| First choose the colors for your shelf. I am going to paint the Daisy yellow with two tone green leaves. You can paint the daisy pink or blue or a mixture if you want to. It's up to you. |
 |
| Dip one side of a half inch paint brush, in white and the other side in green. It doesn't matter if they touch and blend a little. |
Eugenie Woodcraft
Beautiful furniture, made simple.
How to Paint an Antique a Daisy Shelf, Part 2
How to Antique and Paint a Yellow Daisy Shelf
Eugenie Woodcraft
Beautiful furniture, made simple.
 |
| Make strokes going with the natural curve of the leaf, following the veins, inside to outside. Don't blend the paint too much. Don't paint in the grooves. |
 |
| Paint the daisy the same way but with yellow and white. Start at the bud and make one stroke to the end of the petal. Let it dry thoroughly. Now use a light water based stain, I am using Pecan and a small brush and wipe the stain over the daisy and the whole shelf. Make sure to get the stain in the cracks. Then take a dry cloth and wipe off the extra. Let the stain dry. Coat your shelf with two coats of water based varnish, sanding lightly in between each coat to seal and protect the shelf. |
 |
| Voila! This is what your shelf should look like when you are finished. |
Beautiful furniture, made simple.
Saturday, February 16, 2013
How to Antique Painted Furniture. Part 1
Swans and Roses Pine Bench
I am going to antique a new bench model, that I have just finished. I am painting on new wood, but this type of finish is great on old painted furniture. I am going to antique a Swans and roses bench that will be available on Sawtooth Ideas soon, as a woodworking plan, so you could do the same project if you want to. This bench is also available on Etsy finished or non finished.
I am going to antique a new bench model, that I have just finished. I am painting on new wood, but this type of finish is great on old painted furniture. I am going to antique a Swans and roses bench that will be available on Sawtooth Ideas soon, as a woodworking plan, so you could do the same project if you want to. This bench is also available on Etsy finished or non finished.
 |
| Paint your bench as desired. I chose a light blue paint for the bench, two shades of green for the leaves and two shades of pink for the roses. I painted the swans white with yellow beaks. |
 |
| You don't have to paint in the grooves, just the basic shape. When you have painted the whole bench, let it dry thoroughly. |
 |
| Don't forget to paint the sides. |
How to Antique Painted Furniture Part 3
Antiqued Swans and Roses Pine Bench
Eugenie Woodcraft
Beautiful furniture, made simple.
www.etsy.com/shop/woodcraftqueen
www.sawtoothideas.com
 |
| Apply two coats of water based varnish over the whole bench to protect the finish.This is what your bench should look like. This woodworking plan will be available soon on Sawtooth Ideas and is available on my Etsy as is, or unfinished. |
Beautiful furniture, made simple.
www.etsy.com/shop/woodcraftqueen
www.sawtoothideas.com
How To Antique Painted Furniture. Part 2.
Antiquing a Swans and Roses Pine Bench
Eugenie Woodcraft
www.etsy.com/shop/woodcraftqueen
 |
| To antique paint, I use either stain or antique gold paint. Plain old water based craft paint works well. This time I am using antique gold paint because I chose a light colored paint. Antique gold looks nice on light colors. On a darker color, I would use Pecan or Walnut stain. |
 |
| Use the small brush to paint the antique gold in the grooves. Do one section at a time, before the paint has time to dry, wipe each section down with the wet sponge dipped in the gold paint. Follow the grain of the wood, leaving the amount of antiquing that you desire. The antiquing is going to take some of the brightness out of the paint, giving it an aged look. |
 |
| Don't forget to do the sides. |
www.etsy.com/shop/woodcraftqueen
Tree Cupboard Part 2.
 |
| I have routed the inside of the cupboard door to make a place for the etched mirror. |
 |
| This is one of the two drawer fronts. I am going to carve little birds on them in keeping with the tree theme. |
 | |
| I have carved the two door fronts and routed the back. The doors are now ready to stain. Eugenie Woodcraft Beautiful furniture, made simple. |
Wednesday, February 13, 2013
Small bathroom Vanities or Sink Cabinets
Small sized bathroom vanities
Eugenie Woodcraft
www.etsy.com/shop/woodcraftqueen
 |
| These are two small sized bathroom vanity sets that I have built, one is white and the other is Special Walnut. They have matching pharmacies with a mirrored door, and rose carvings. |
 |
| I made a dressing table to match with the white set. The dressing table is attached to the wall. |
 |
| This is a pretty pink dressing table with matching bench. |
 |
| This is a custom model I made for a Cabin in the woods. |
www.etsy.com/shop/woodcraftqueen
Wooden Bathroom Sink Vanities
Hand Carved Bathroom Sets
by Eugenie Woodcraft
 |
| This is Angelina with matching towel cupboard on the right. |
 |
| This is Angelina, my large bathroom set with matching vanity. On the left is Monica, my box bureau and on the right is a dressing table with a hidden shelf underneath and my swan bench. |
 |
| This is Angelina a smaller version in Pecan. This model features towel bars on both sides . |
Sunday, February 10, 2013
For Women Only, Woodworking Plans


Beautiful Furniture, Made Simple.
www.sawtoothideas.com
Eugenie Woodcraft
Let him do the dishes,
you've got things to build!
Large and Small Simple Woodworking Plans
 |
| You can build this lovely, large bookcase, |
 |
| Or this small garden or tool box. With the glue, screw and cap method you can build something big or something small, it doesn't matter. This simple method is very versatile, it works equally well for small projects or large ones. Check out all the things you can build on www.sawtoothideas.com Eugenie Woodcraft For more information on the Glue screw and cap method, check out my post, Simple woodworking, Glue screw and cap method part 1. 2. and 3. |
Subscribe to:
Comments (Atom)